12/17 - Merry Christmas from Keith's Arcade
It has been quite a year for me. A year of major change has brought on a new job, a new truck and a fresh start at high school for Alli. And alot of arcade games have come my way. Some have stayed and some have gone. But no matter the cards I'm dealt in life, I'm always amazed every time I step into my basement and see how my collection has grown and evolved. This hobby is truly my escape from the rat race and I couldn't be more greatful for how fortunate and blessed that myself and my family have been.
In celebration of 2012 soon coming to a close, I have finally posted updated photos and a video of my gameroom. Be sure to visit the My Games page to check them out. Some of the photo's were taken recently, and some are higher resolution photos shot by Jeremy (The Basement Arcade) during his last visit.
So Merry Christmas to everyone, and here's to a great 2013 ahead.
11/25 - Four games depart the cave, but now we're Cruis'n...
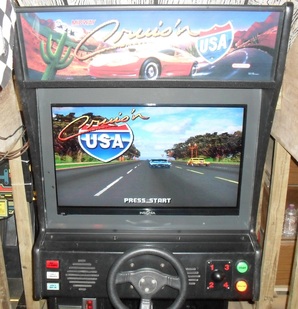
Click image to visit Cruis'n USA page.
Sometime's life just deals you a low card. In my case, a recent job layoff forced the sale of some of my games. In the past couple of weeks, California Speed, Crazy Taxi and the Megatouch 6 Cabaret all left the lineup and entered new homes. I had also recently bought and flipped an Astro Fighter cocktail game. It too is now gone, but not before I shot a video of the cabinet and gameplay (click here to see that video).
While this was going on, I had luckily found another job. Albeit temporary, but it sure beats unemployment. And who knows, it may become permanent after the holiday season. But I digress. I still scan Craigslist for deals frequently, and this Cruis'n USA popped up. It was close to home and priced right, I couldn't let this one slip by. The game was in great condition but played blind. After lugging two big and heavy driving games in and out of my house, I decided to go a different route with this one. As you can probably tell from the photo, I mounted an LCD TV in this sucker. While most of my game's would likely look lousy with an upgrade like this, it works well for this game.
Click here to check out the new Cruis'n USA page, which includes details and a video of how I installed the LCD TV in this game. Enjoy.
11/9 - You're gonna need a blanket and suntan lotion...
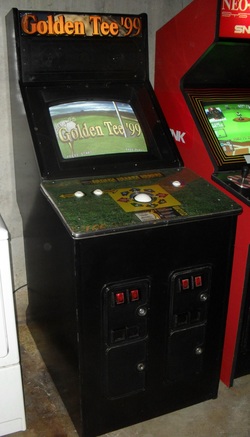
Click image to visit Golden Tee '99 page.
...'cause you're never gonna get off that beach!
One of my favorite lines from one of my favorite movies "Happy Gilmore". And a line I would constantly say to my buddies every time they ended up in a sand trap in Golden Tee Golf back in the day.
Ok so you can guess by now, I just picked up a Golden Tee game.
Now I know what the educated crowd here is thinking. It's merely a Golden Tee '99, part of the classic series. Yeah I know, the Fore! series has gotten to be very affordable to us collectors. I personally just wanted a simple and small conversion from the classic GT lineup. Not to mention it was another cheap and local find. Just what I wanted for the cave.
Click here for the full story on this latest pickup. I have also shot a video of the game which can be seen below. Enjoy. The addition of this game is just one of many changes that have recently taken shape in my collection. Please stay tuned for more updates.
10/20 - Chain reaction trading leads to new Megatouch Maxx Jade 2 game
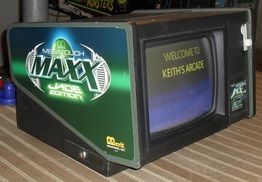
Click image to visit Megatouch Maxx Jade 2 page.
As many of you already know, I own a Megatouch 6 game. I've always had high praise for the classic Megatouch lineup and still do. So why did I get a newer model? Well, this Megatouch Maxx machine showed up as a result of chain reaction trading. To sum it up, Sue had found a "High Impact Football" arcade game at a yard sale for a mere $25. I intended on flipping that game, but instead I eventually worked out another trade deal with Slackers to obtain this one. It didn't take long for all of us to get hooked on this machine.
Click here to read the whole story behind our latest pickup. I also shot another video which can be seen below. Enjoy.
Click here to read the whole story behind our latest pickup. I also shot another video which can be seen below. Enjoy.
The Megatouch 6 page has also been updated with new photos and a video. Click here to visit that page.
9/15 - Review: ArcadeShop MCR Switching Power Supply Adapter

If there's one common failure with MCR games like Tron & Satans Hollow, its the power supply. Two common culprits are the linear power PCB and the "suitcase", more specifically, 2 large caps that can and will eventually fail. These old parts often lead to bigger problems, anything from display issues to, well, a dead game.
ArcadeShop has your solution. It's an adapter that allows you to wire in a modern switching power supply with minimal hacks to your game. In fact, the only hack needed is to splice into a 120V AC line. That's it. The existing connectors in the game plug right in. Once installed, clean power is sent to the boardset, completely bypassing the troublesome "suitcase" and eliminating the linear PCB alltogether.
I bought 2 of these kits some time ago when my Satans Hollow display started doing the "wave" and my Tron wasn't far behind. In both cases, it was those pesky suitcase caps. I could have replaced those caps, but since I had spare switchers laying around, I went this route, seeing as how it would cost virtually the same. I haven't looked back since. This was almost 2 years ago. I put off a review of these adapters (until now) because I wanted to ensure reliability. Well, I haven't had any problems and both of my MCR games are still going strong. So a big thumbs up to ArcadeShop for these adapters.

Now there is a small design flaw that I will tell you about and it's a very easy fix. These adapters are designed to fit right into the screw terminals of a standard switching power supply. However I did notice that they didn't mate well, causing the adapter to be loosely mounted to the switcher. I got around that by carving small "half moons" into the ends of the five finger connectors on the adapter, which I have illistrated here. After performing this modification, the adapter mates much better with the power supply.
Another common misconception with any MCR power supply adapter is that they cause an audio "hum" in the game. I did run into that problem as well with my Tron machine. However I quickly isolated the problem to the specific switcher I was using. I tried another switcher and the hum disappeared. I have heard multiple reports that some MCR games require a "heavy duty" power supply. I'm not sure if that's what I ran into. In any case, ArcadeShop sells the power supplies as well, and I'd have to assume their brands are designed for more precise compatibility.
The bottom line: I would highly recommend these adapters for anyone who hasn't already rebuilt their power supplies in any Bally/Midway MCR games or for anyone who's having a power related issue with their game. With some simple modifications and the proper power supply, these adapters are a great alternative to the original linear power supplies that these games originally came with.
Click here for more information on the ArcadeShop MCR Switching Power Supply Adapter.

8/18 - RoadBlasters, an old friend comes back home
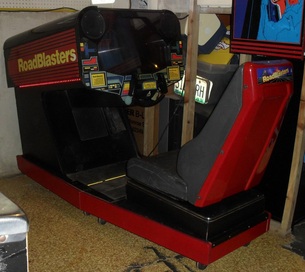
Click image to visit RoadBlasters page.
As some of you may or may not know, RoadBlasters is near and dear to me. I have very fond memories of playing this game. A few years ago, I was fortunate enough to find one, for free at that. I brought it back to life and kept it in my private collection for some time. Then, when the opportunity for Tron came along, I had to let RoadBlasters go.
As these past couple of years have come and gone, I always had a small thought about how it would be cool if I could find another RoadBlasters, this time in cockpit form. The upright's are a dime a dozen (or at least they seemed to be). However the cockpit models are a whole other breed. They are very scarce. It took me years to find one, and when I did it was yanked from me at the last minute.
Luckily another one came along just a few months later. I use the word "luckily" with a big lump in my throat, as this turned out to be another "sight unseen" disaster of a game. Well the deal was made and there was no turning back. I really had to get creative with this one. As you can tell, it doesnt look like any kind of cockpit anymore. Why? Click here for the full story.
7/1 - Another KC roadtrip, a new "Challenger" enters the cave...
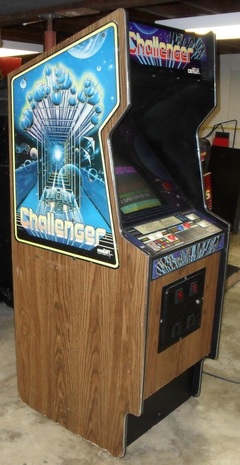
Click image to visit Challenger page.
Yep, I've said it before. Sometimes you dont seek out the game, it seeks you out. Heres another example of that. This obscure gem found it's way on Craigslist and it wasn't long before I found myself on another journey to claim it.
Now if this pickup story sounds familiar, take another look at my Space Zap story. Yep, another classic space shooter, another KC roadtrip and another $125 spent. Well, sort of. This turned out to be a project game after all. Luckily it didn't take much to get this one back to health and add it to the lineup. The addiction of arcade collecting continues.
Click here to read all about my latest score. I also shot a video which can be seen below. Enjoy.
6/9 - Extreme Makeover, Donkey Kong Edition...
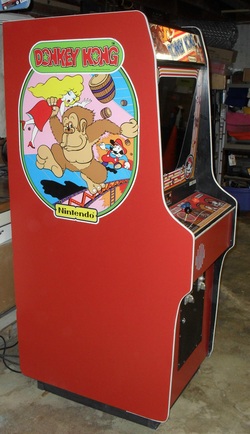
Click image to visit Donkey Kong page.
Well here it is. As Keith Apicary would say... "I gave him a new shirt". I bought this restored game a few years ago, however the paint job it had was a bit butchered. I never let it bother me much. However, I recently restored a Donkey Kong Jr. cabinet, and after that it became pretty clear that I was going to do the same for this game.
Seeing as how this was one of three games in my Nintendo lineup, I wanted to give each cabinet it's own color. Donkey Kong Jr. is orange and my Mario Bros. sports the original DK blue. So I decided on red. Why? Well, back in 1981 when this game was originally released, Nintendo was recycling the red cabinets from a game called Radar Scope, which was released one year earlier and apparently was a big flop in the states. So early runs of DK were acually released in these red cabinets.
While mine is not born red which will turn some of the purists away, I still think it looks great, and it adds a whole new look to "Nintendo Row".
Check out the updated Donkey Kong page for more on the facelift, including new photos.
5/25 - Alli's new game, it's Crazy Taxi
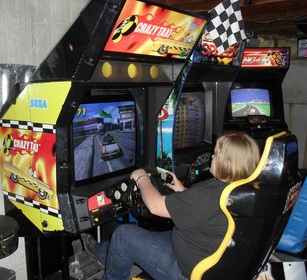
Click image to visit Crazy Taxi page.
The mystery is finally over. If you read my last post then you know I got to take home another game, and I mentioned that it was one of Alli's favorites. Many of you could have probably guessed which game it was, and now the guessing game can conclude, its Crazy Taxi!
Alli loves playing this game on the home consoles, so how could I pass up the opportunity to score a virtually free arcade game of her very own? She's not quite sixteen yet, but I can give her a "new ride" a couple years early. Of course, she may want to trade this one in when she gets her real license.
Click here to read all about our latest pickup.
4/14 - Who's up for Skee-Ball?
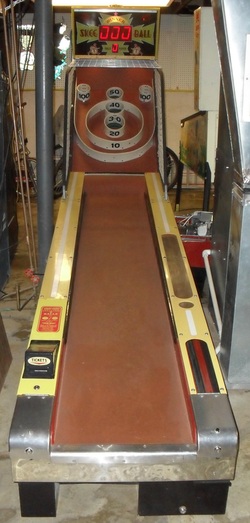
Click image to visit Skee-Ball page.
Well I promised the next update would be a good one and here it is. My very own Skee-Ball machine.
If you are among the, oh, lets say 99 percent of us who have played Skee-Ball before, then you can probably understand my excitement. This game was everywhere back in the day and still remains popular in today's world as well. The sights and sounds of this game are truly unforgettable. It really takes me back.
When the opportunity arose to score a free Skee-Ball machine in exchange for repair work on a few more machines, I just couldn't turn it down. Skee-Ball is awesome and I'm happy to have it in my home with the other games.
Want to know more about this machine and how I was able to add this to the collection? Click here and read all about it.
More great updates are on the way, stay tuned.
3/24 - Maintenance Log
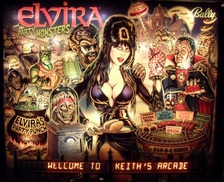
Click image to visit Elvira page.
When I'm not spending all my resources on new games, I'm finally able to put some funds towards restoration work. This time around, I addressed the burned out displays in my Elvira pinball machine. No matter what I tried, they just could not be saved. So I bit the bullet and purchased new Rottendog LED displays from ArcadeShop. These displays look great and consume far less energy than those old plasma displays. If your originals are dead, these are the way to go.
While I was ordering displays from ArcadeShop, I decided I'd kill two birds with one stone and added a new control panel overlay for Tron to my order. This was another upgrade that was badly needed. Just take a look at the before and after photo's below.
Stay tuned for the next update, it'll be a good one.
3/4 - Extreme Makeover - Donkey Kong Jr. Edition...
Click image to visit DK Jr. page.
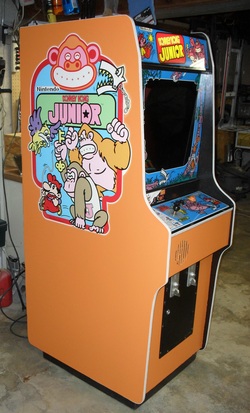
Ok, to be honest, my Donkey Kong Jr. arcade game was in pretty good condition before, but there were a couple flaws. Mainly the ripped up side art which I later removed, but also some minor damage to the cabinet, specifically on the bottom front corners. Turns out my cabinet was made of particle board. I have two other Nintendo games (Donkey Kong & Mario Bros.). Both of those cabinets are made out of plywood which can take a little more abuse. My Jr. was basically the mushy meat in a sandwich of plywood Nintendo games.
It was never in my plan's to really restore this game or even to apply new side art for that matter. However a few months back, I found a deal I couldn't pass up on. Someone on CL was selling what he described as a gutted DK Jr. project cabinet and had a fair price on it. Naturally I inquired about it. Turns out he's a fellow KLOV member who happens to live about 10 minutes from where I work. He originally aquired this game as a converted "Jail Break" game and made plans to restore it back to it's former glory. Then he ended up finding a complete & working Jr. a short time later and put this project up for grabs. He had done most of the bondo work already and was also including some spare Nintendo parts, including a working Sanyo monitor and brand new T-Molding. If nothing else, I can always use spare parts, so I decided to go for it. Upon pickup I discovered that this was indeed a plywood cabinet, and I knew from that moment that I was going to make this my new Jr. cabinet. I even got a service call out of the deal and helped him revive his "Gauntlet" game, so in reality this game didn't cost me a dime. Nice!
Now rewind a few months earlier. Another fellow forum member gave me some free side DK Jr. side art, and he even covered the shipping. Thanks Greg! Turns out one side isn't as glossy as the other and a few of the white's had yellowed a little bit. Well for a freebie, I certainly won't complain one bit. Luckily I had not got around to applying it to the old cabinet, and it turned out great on the new one.
Enough rambling, here's a slideshow of the progress. You can also click here to visit the updated DK Jr. page.
2/4 - Keith's "Vecdrive" controller now featured on Vectrex Wiki...

I was recently approached by Darryl B who is the founder of the Vectrex Wiki page. This page has lot's of information regarding the Vectrex Arcade System, both past and present. As you may recall from my YouTube review of the Vectrex from a couple years back, I made mention that the Vectrex likely has the largest movement of homebrew games & accessories of just about every home console. You might also recall how I complained about the control for games like Hyperchase.
I recently had the eppiphany to build my own homebrew controller for the Vectrex. It's a simple conversion of an old Atari 2600 Paddle, but with an extra button and shift lever thrown in. This handy controller works great for Hyperchase and make's the game more enjoyable. It also works great for some newer homebrew titles such as Vectrace & Vaboom.
I posted a video demonstration of my creation, and it wasn't long before Darryl found my video, dubbed my device the "Vecdrive controller" and featured it on his Wiki page. Click here to check it out, or click here to see the Vecdrive as well as other controllers listed in the Peripherals section. You can also watch my video demonstration below.
1/9 - New year, new arrangement, new photos, new video...
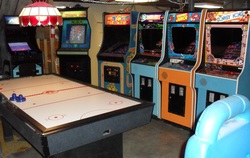
Click image to visit my games.
I decided to ring in the new year by giving my humble little unfinished gameroom a little makeover. The new setup is more presentable & more inviting. This year I want to focus less on buying more games (yeah I know, blasphemy) and focus more on keeping my current lineup healthy inside and out. I am also hoping for more visitors this year. After all, these big display's of gaming history are here to be played and admired.
Visit the my games page to view a slideshow of the new setup. I also uploaded a new video which can be seen below.
Visit the my games page to view a slideshow of the new setup. I also uploaded a new video which can be seen below.
